This blog contains posts about both original designs and items I've made based on others' patterns. Any patterns posted here are my original work and are my sole property. They may be printed for personal use but may not be copied or reposted. Items are intended for personal use, gifts, or sale for charity.

29 December 2011

Chevron Cardigan

It's cold, and while I understand it would be better to work on cold-weather items before it actually gets cold, I never do.

So today I started work on this chevron cardigan. I chose it because it works up quickly, and as I said, I'm already cold.  Also, when I looked at the project pictures on ravelry, they were all pretty cute; that gives me confidence in a pattern, when it works in anyone's hands.  Also also, it says it only needs 600-800 yards of yarn, which is pretty good for a sweater.


This is the first 9 rows.  The first 5 rows increase from the neck down, and after that it's a relatively straightforward chevron pattern for the remainder of the yoke.  I'll get back to you after I have the yoke done.


Here's a stitch detail.  I got a gift card to Michael's for Christmas, and the store was duly ransacked by holiday shopping; the yarn shelves were depleted.  That meant the only sport weight yarn available was in the baby section; I was happy to find anything designed for someone over 18 mos old.  This is Bernat Softee Baby in Flannel (I don't know why it's not just called grey.)  The pattern suggests a size J/10 hook, and that is working nicely to match the gauge so far.


I am looking forward to seeing how this one takes shape.  And then to being warm.


--Update 9.8.2012 --

Sometimes I make myself laugh.  I put this sweater down for a VERY long time, and when I finally picked it back up, it took all of 3 hours to finish.  At least I'll have it for the cold months this year.

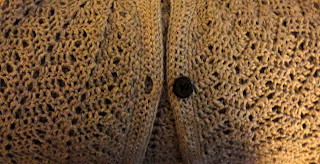
I am happy with the finished product.  My buttonhole is too wide, and the button stock at the craft store left something to be desired, so I couldn't find a big enough button that suited the color of the yarn.  The black one I have on now will do, but I will likely change it out.

In the meantime, enjoy these pictures of the finished sweater:

Add From the front.  The shoulders aren't actually all that football gear-ish.  I just have on an inappropriate undershirt. 

From the rear.  I shall be more careful to untwist my sleeves in future.
 I like the texture of this sweater a lot.
Detail of the closure and its abnormally large buttonhole.


24 December 2011

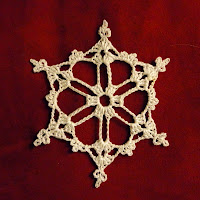
Snowflake Doilies


This pattern is from Mypicot.  I am a big fan of their large, easy-to-follow charts.

These come out large and are better as window snowflakes than tree snowflakes.  In my case, they are intended as small doilies for my grandmother to put under her dinner candles.  She's an 88-year-old widow who still lights candles at every single dinner.

21 December 2011

My First Necklace

I've seen the pattern for this necklace several times on Ravelry, and I really like it.  The tutorial is fantastic, and the necklace is easy to construct.  I didn't have a needle small enough to make it through the smaller seed beads, so I just used a needle threader.  It's a little slow, but it works well.  I'm pleased with the finished product.

 Some of the beads want to turn the wrong way, so blocking is important for this item.

I worked the closure with a magic ring instead of the  12ch loop in the pattern.  That way I could adjust it to fit the button I managed to find.
 The finished necklace hangs in two strands and is elegant and simple.

My version is worked in Ecru DMC Traditions Crochet Cotton in size 10 with a size 7 steel hook.  

The pattern calls for drop-shaped beads, but I couldn't find any.  These round ones worked well.


The larger beads are size 6/0 glass beads in a pearl color, and the smaller beads are size 11/0 glass seed beads that are clear with a little silver inside.

Beyond that, I used a needle threader, a button, and a needle to weave in the ends.  It's as simple to make as it is to wear.

Snowflake Extravaganza

I have this ambition to make an heirloom bedspread in thread crochet, and as a result, I am in possession of nearly 2 miles of white cotton thread and about 8 finished bedspread motifs.  (I don't anticipate finding myself with a finished bedspread any time soon; perhaps I'll finish it by the time my daughter is ready to move out of the house.)

I have used this thread to make several other things in the meantime--the dresser scarf I've already posted about, the table runner that is currently hibernating, several bookmarks and other small sundries.  Since the thread is no longer dedicated solely to bedspread construction, I now spend lots of time doing thread crochet.  My mom tells me I look very focused when I work; I think really I'm just trying to see the stitches.

At any rate, I now present for your viewing pleasure several snowflakes I've constructed for my co-workers. I found all of the patterns for free on Ravelry. I didn't get good detail shots of the ones I made for work because the camera battery died as I was rushing out the door to deliver said snowflakes.  Still, I have a group shot.


I also made snowflakes for the kiddos in my life to contribute to their growing ornament collections.   The photos below include shots before and after blocking in order to demonstrate the difference a little patience makes. Some of the ones I made for work are merely starched and pressed rather than blocked; the ones I made for the kiddos turned out much better.


Elder Niece is quite a good crocheter herself, so I went ornate.  To the left is fresh off the hook.  To the right is the pinned and stiffened finished product.  Pattern is the first one here.


Nephew is getting a pointier ornament.  The blocking process is very important in this ornament, as is clearly seen in these two shots. Find the pattern here.


My son chose the most involved snowflake to add to his collection.  The one on the left is pretty; after blocking it has a lot more structure. Here is the pattern.


Younger Niece's snowflake has more structure on its own because of the heavy outer stitches.  Blocking makes it pointier, but it doesn't change it much. It's the first pattern on this page.


Daughter's is made more elegant by blocking. It's the second pattern here.

This is my first attempt at snowflakes.  For blocking, I pinned them to a piece of cardboard covered in plastic wrap, sprayed them with heavy starch, and let them dry overnight.  They are holding their shape for now, but they aren't stiff, and I imagine they will be a little less structured as time wears on. Of course, they are washable and can be reshaped.

Next time, I'll likely make a glue and water solution, soak and pin them, and let them dry.  I think they will be more durable that way.

One last shot of a snowflake under construction.


01 December 2011

Just a Small Detail

National Novel Writing Month is over, and I should be making fast progress on this table runner.  Alas!  Alack!  I've lost my steel hook!


29 October 2011

Thread Crochet Table Runner


  Update 3/2/2012: I picked this back up in mid-January and finished it at the end of February.  I blocked it and ironed it, and then I promptly proceeded to ruin it.  I burned it with the iron.  I had about a week to try and salvage it before the auction, so I dyed it with tea to hide the burns.  It's not perfect, but it's a lot better.  The auction is tomorrow, so we shall see what it earns.


Update 11/4: Here's the first week's progress.  I'm participating in National Novel Writing Month, so progress will be slow for November.  This table runner will definitely require blocking, but I think it will turn out nicely.


I've begun work on a thread crochet table runner using this pattern.  I plan to offer it at an auction to benefit my son's school.
There's not much to say about it at this point.  It's worked in size 10 thread with a size 7 steel hook.  It's a logical, easy pattern that progresses quickly, the sort of item that you can hook while watching Fringe and still follow the story line.

It's likely that I will put it down for a few weeks while I engage in NaNoWriMo, but there's a good long while before the auction, so I'm in no hurry.

Here's hoping nostalgia will fetch a decent price!

27 October 2011

Cascading Keyhole Scarf

With a nod to Rebecca's Cascade Scarf , I created this pattern after making my daughter's keyhole scarf.  I wanted a full-sized scarf for myself and have been interested in working a cascading scarf for a while.  This pattern uses similar construction techniques to the one cited above, but the pattern has enough modifications that I thought it warranted its own post.


Worked in a neutral textured yarn, this is a nice compliment to a fall wardrobe.  The keyhole design uses less yarn than a conventional scarf because the scarf is shorter.  Because it hangs in the center, it wears well with a jacket or blazer.

This yarn came from my grandmother's stash and was unlabeled.  I am not sure what its official weight or fiber content is, but it is slightly stretchy and seems to be a heavy worsted-weight yarn.  It is comprised of synthetic strands of ecru and brown and an elastic strand of black.  It has a texture similar to readily-available boucle yarns.

Cascading Keyhole Scarf
Guage: 11 st = 4 in
Yarn: just over 2 50g balls of worsted weight yarn
Hook: Size J

A NOTE ON GAUGE: Several people who have made this scarf have found that their scarf ends up shorter than mine. It is a simple matter to increase the number of stitches in your starting chain, though this may alter the placement of the keyhole.  Again, the yarn I used was unlabeled, so it is entirely possible it was aran weight rather than worsted. It's probably a good idea to check the length after the first or second row just to make sure it's what you want.

Ch 97.
Row 1: sc in 2nd ch from hook and in each ch across. (96 sc)
Row 2: ch 2, turn. hdc in same st, hdc in next st, (2 hdc in next st, hdc in next st) across. (144 hdc)
Row 3: ch 3, turn. dc in same st, dc in next 2 st, (2 dc in next st, dc in next st, dc in next st) across.
(192 dc)
Row 4: ch 4, turn. tr in same st, tr in each of the next 3 st, (2 tr in next st, tr in each of the next 3 st)
until 56 st away from end, ch 6, sk next 6 st, resume pattern (keyhole made). (240 tr)
Row 5: 2 sc in each st across. (480 sc) Finish off. No edging.

25 October 2011

Dresser Scarf


This is a dresser scarf I made for my mom last Christmas.  I used motif pattern 4004 from mypicot.com , size 10 crochet thread, and a size 7 steel hook.  I am very interested in thread crochet but have yet to develop the patience to see a large-scale project through.

mypicot.com has fun, modern motifs.  I recommend the site to anyone who is interested in thread crochet but who wants to do something other than vintage crochet.


               Here is a detail of the motif.


24 October 2011

Ribbed Picot Keyhole Scarf for Toddler


This is the first pattern I've posted online.  Please let me know if you find errors, and feel free to post any modifications you make in the comments section.

This pattern is my sole property.  You may print it for purposes of making the project, but you may not sell or repost this pattern.  Items made from this pattern are for personal use or may be used as gifts or sold for charity.


YARN: Bernat Cottontots, Green
HOOK: I, 5.5 mm
Pattern uses US terminology.

Note: All hdc worked into back loops only.

Ch 91.
Row 1: hdc into back ridge of 3rd ch (counts as first hdc),  hdc into back ridge of each ch.
Row 2: ch 2, turn (counts as first hdc here and throughout pattern).  Working in back loops only, hdc in each  
            hdc.
Row 3: Ch 2, turn.  hdc in next 20 st, ch 5, sk next 5 st, hdc in remainder of row.
Row 4: Ch 2, turn.  hdc in each st.
Row 5: Ch 2, turn, hdc in each st.

EDGING: ch 3, join with sl st at base of ch (picot made).  3 sl st along edge, picot, 3 sl st around scarf.  Finish off.


NOTE: The pink version pictured here is modified for better staying power.  I found that a single keyhole isn't necessarily enough to keep the scarf on an active child, so I worked the scarf with 2 keyholes.  It is widened to 8 rows, with keyholes placed in the 3rd and 6th rows.  The keyholes are still 5ch wide.  The woven look is attractive, and the scarf stays in place much better.

This pattern is easily modified for length and width.  For one keyhole, ensure that you work an odd number of rows, and place the keyhole in the center row. For two keyholes, simply ensure that the two holes are evenly spaced. The width and placement of the keyhole may be need to be modified as the size of the scarf is changed.