This blog contains posts about both original designs and items I've made based on others' patterns. Any patterns posted here are my original work and are my sole property. They may be printed for personal use but may not be copied or reposted. Items are intended for personal use, gifts, or sale for charity.

27 September 2013

Ribbed Boatneck Dress with Shell/Picot Edging

I had some yarn leftover from my Great Cheap Sport-Weight Yarn Competition that just HAD to be put to use, and my daughter was BEGGING me to make something for her instead of for myself, so I created this:


(Sorry, to say, I still haven't replaced camera broken by said child, so terrible (stupid)phone  photo will have to suffice.)

This garment is suitable for beginners, so enjoy!


MATERIALS:
Color A: Bernat Softee Baby Soft Fern (1 skein)
Color B: Caron Simply Soft Light Real Red (Just a little)
Color C: Bernat Softee Baby Antique White (1 skein)

Hook sizes G6 and H8

Yarn needle.

GAUGE: 10 rows and 16 st = 4” in BLO dc.

This dress does have 2 seams, but it is NOT hard to piece them. Directions are for a 4T dress; it is easy to customize and adjust for a larger size.

FRONT AND BACK: Using G6 hook, work two identical pieces using the following.
Work in Color A. Ch 80.

ROW 1: Working in back ridge of starting chain, dc in 4th chain from hook, dc in each ch across. (78 dc) Turn.
ROW 2: ch 3 (counts as first dc), sk 1st dc, dc in BACK LOOP ONLY of each dc across (78 dc) Turn.

Now is a good time to test for length. If measuring on a person, hold the swatch slightly above armpit height. Keep in mind that the bottom edging will add around 2" and that its weight will pull the dress down. If you need to add length, frog and increase the number of stitches in the starting chain.

ROWS 3-28: Repeat row 2.

[For larger sizes, add length by increasing starting chain. Any number of stitches is acceptible. Do remember that the eventual weight of the edging on the bottom will cause the dress to hang a little longer than it appearsat this stage. For adding width, add an even number of rows. Easy peasy.]

When your rectangle is the desired length and width to fit comfortably around the belly, it's time to cinch the top. To do this:

Turn the work so that the ribs run vertically. Ch 1. Work 1 sc around the post of the top dc in each of the 28 rows (28 sc)

Before cinching. (FYI: This is just a swatch.)
After cinching. (Still just a swatch.)


JOIN COLOR B (red)

ROWS 29-30 (or whatever): ch 1, sc in each sc across (28sc). Finish off.

With right sides together, sew front to back in color A. Leave 8 stitches unsewn for arm holes!

COLLAR:
NOTE: Even though this is now a round pattern, you will turn at the end of each row. This will help hide the seam in the middle of the back.

Attach color C with sl st in middle of back panel.

ROW 1: sc in each sc to edge of panel (14 sc), ch 25, sc in ea sc across front panel (28 sc), ch 25, sc in ea sc to start of round, join with sl st. Turn. [For a larger size, don't forget to increase the number of chains in the arm holes.]

ROW 2: ch 2 (counts as hdc), hdc in sc BEHIND your chain, creating a crossed stitch effect. (Sk next unworked st, hdc in next st, hdc in skipped st.) around.

ROWS 3-6 will follow this same basic pattern, but you will work a DECREASE stitch at the beginning and end of each arm hole. To DECREASE your row, do this:

As you approach the arm hole, (sk 2 st, hdc in next st, hdc in first skipped stitch) twice, then continue in pattern. As you reach the other side of the arm hole, repeat. [This is flexible. Depending on your yarn and desired fit, you may wish to decrease only once. For a boatneck fit, decrease once per joint (4 decreases total); for a fit that resembles straps, decrease twice per joint (8 decreases total).

ROW 7: Join color B. sc in each st across.


BOTTOM EDGING:
Switch to H8 hook.
ROW 1: Using COLOR A: 3sc per row around base of dress, spaced evenly.

ROW 2: JOIN COLOR B: sc in each sc around. Join with sl st. Turn.
ROW 3: ch 1, sc in each sc around. TURN.

JOIN COLOR C.
ROW 4: ch 2, hdc in same st as join, (2 hdc in each sc) around. Join with sl st. Turn.
ROW 5: ch 2, hdc in st BEHIND your chain, creating crossed stitch effect. (sk next unworked st, hdc in next st., hdc in skipped stitch) around. Join with sl st. Turn.
ROW 6: ch 3, dc in st BEHIND your chain, creating crossed stitch effect. (sk next unworked st, dc in next st, dc in skipped st) around. Join with sl st. Turn.
ROW 7: Repeat row 6. Finish off.


EDGING ALONG ARMS.
ROW 1: Join COLOR C at back. Sc in ea st across (25 sc)
ROW 2: ch 3, sk 3 st, 4dc in next st, (sk 3 st, 5dc in next st –shell made) 6 times.
ROW 3: (ch 3, picot, ch 2, sl st in center st of next shell) 5 times. Finish off. Repeat for other arm.

Picot= ch 3, sl in 1st ch of picot. Practically, this means you will ch 6, sl st in 4th ch from hook, ch 2, sl st in center of next shell, repeat.

IF YOU WANT, you can use the tail of the edging to cinch the arms to the body of the dress. This can help create a boatneck look.

Weave in ends. Yay, dress!

20 September 2013

The Great Cheap Sport-Weight Yarn Competition Round Two: Crochet That Fits Cap-Sleeve Top

In the second installment of The Great Cheap Sport-Weight Yarn Competition, we meet Caron Simply Soft Light. Weighing in at 3 oz. (330 yards) per skein, and costing around $4 apiece, this top cost me a staggering grand total of $8. Not surprisingly, it is similar in texture and feel to its big sister, normal Caron Simply Soft.


Before we begin, I must apologize for the ridiculously bad quality of the pictures accompanying this post. My beautiful, charming, dear, sweet offspring has damaged our Real Camera, so I'm left with phone pictures. And since I prefer to keep my phone as stupid as possible, that means its camera is also stupid. Aggravating the problem is that I had to take mirror shots, and I'm too busy making sweaters to properly clean my mirrors. Alas! for us all, I'm sure.

Let's talk about the shirt itself first. (I'm not calling it a sweater because it's basically sleeveless, and sweaters are for warmth.) This top is worked in four pieces: Front, Back, and 2 straps. Edging goes around the sleeves and along the bottom, and a single row of sc is worked to finish the neckline. (The pattern [may require login] suggests using elastic on the neck, but I just switched to a smaller hook.)

 It is worked vertically, and on the front piece, there is a band of sc just under the bust that provides the shaping, so the pattern uses stitch height rather than number of stitches to control the shape. It makes the pattern very flexible so that you can work it to fit your own shape.  I'm a fan of this technique. The skirt at the bottom is created by working in trc; I like the swing of the skirt, but the transition from dc to trc is a little jarring to me. Given my shape, though, I had to include it.


Now for the yarn:

First up, I love this color. I love that this light-gauge yarn comes in bold, fun colors. I like that I can look like a grown up in cheap sport-weight yarn. Huzzah for the color options!

In terms of how it feels, it's not bad for an acrylic yarn. It actually is pretty soft, and it doesn't bother my skin while I'm working or wearing. It's not all inviting and tempting for people to touch, which might be a good thing since I don't typically enjoy the touch of the uninvited.

It is a little fuzzy, so don't expect very defined stitches from this yarn. Also, there was a knot or two in each skein, but they didn't cause problems on this particular piece. The weight of the yarn is actually pretty perfect for this garment. Because of its unconventional construction, it seems that it would be easy for this garment to stretch over time. This yarn makes the garment sturdy without making it heavy.
All in all, it's a decent cheap yarn. I'm all about an $8 top, and depending on how it holds up over time, I don't see that a yummy high-end yarn would improve this particular garment all that much. Maybe a little sheen would be nice, but I'll live.

24 July 2013

The Great Cheap Sport-Weight Yarn Competition Round One: Chevron Sweater

Many crochet garments suffer from a draping problem, which is probably due in part to the crocheter's propensity to use readily available craft yarns rather than delicious, high-quality fibers. Crochet garments use A LOT of yarn, and the natural frugality of a DIY clothing maker runs at sharp odds with the temptation of the but-it-feels-so-good-to-wear! siren call of a nice silk or alpaca blend.

It's also due to the way the knots work because they form a horizontal structure rather than a vertical one, and clothes drape vertically (thanks, gravity), so I've slowly, reluctantly come to accept that the best solution to the chunky drape of a crocheted garment is to use small yarn. Even then, crochet garments sometimes lack the grace that knitted garments have.

To that I say, "Fie!"

I've begun an experiment to try to find a cheap DK/sport yarn that will not make me hate life while I use it. Sure, the faux softness of my craft store acrylic yarn doesn't hold a candle to your alpaca, but when I can make a whole garment for around $10, it's worth exploring.  To that end, I am concurrently working on three different tops using three different craft store sport weight yarns.

I finished the first this week.

The Yarn: Bernat Softee Baby, DK/sport weight, between $3.75 and $5 for 4 oz. (333 yards).
The Sweater: This Cute Chevron Sweater
The Result:


I made just a few modifications from the pattern. I began striping on row 6 and alternated colors every 2 rows. I also had to modify the shaping to accommodate the figure I actually have (read: broader hips and a rounder belly than the pattern creator). One of my favorite things about this project is how very quickly it worked up, and that I finally got a crocheted garment that looks good on. I still carry some weight from bearing my kids--well, I can blame childbearing, but it's been long enough now that in reality it's just simple laziness--but this sweater manages to be flattering all the same. As for fit, I'm pleased.

As for yarn, this yarn really worked for this garment. It is actually soft, and though it's hard to find it in a color that isn't characteristic of a pack of Smarties, I managed to find a grown-up worthy green (soft fern) to compliment the relatively safe antique white. (Craft yarn manufacturers have ridiculously decided that all light-gauge projects must be for a baby and that all baby items must be pastel.) The yarn is actually soft, and it didn't split, fuzz, or itch. Even better, only took one skein of each color to make the entire sweater. (Had I gone with long sleeves, I would have needed a TINY amount of the antique white from a second skein.)

Overall, I'm very pleased. I can't have a wardrobe of all green, though, so the limited range of colors is a big mark against this particular yarn.

27 June 2013

New Runner


For some reason, I adore these interlocking circles, and the finished product (with border) is lovely. I also like working from a chart. So this makes for a good (smaller) thread project.  Pattern here. It's not in English, but the chart is clear and helpful.

I'm not sure yet how big I'll make it, but I'll keep you posted.

22 February 2013

Easy Loopy Chain Scarf

After working an intricate pattern in tiny thread, there's nothing I like better than a quick project in big yarn.  I threw this together in an afternoon and felt very, very accomplished.

One of my favorite things about this is that it falls nicely within my goal of creating a sassy, non-boxy project that beginners can complete with ease.  You don't even need a crochet stitch!

I originally worked this scarf in Plymouth's Firenze Boucle, which is a relatively even blend of wool, acrylic, and nylon. The packaging doesn't list a recommended hook size for crochet, but it is likely a bulky weight yarn that takes an I-K hook.  For this project, I used a J.  Later, I made it in a worsted weight cotton yarn with a size H hook.  It's a little shorter, which is fine with me.

RED SCARF:
Yarn: bulky boucle, approx. 60 yards.
Hook: J

GREEN SCARF:
Yarn: worsted cotton, similar yardage
Hook: H


 To begin: ch 160, join with sl st. to first stitch to form a large loop. Guage on the green scarf, 15 st per 4 inches.


RED SCARF: Rows 2-12
GREEN SCARF: Rows 2-14
ch 160, join with sl st to first stitch in the current chain.  Do not join to prior row.  Repeat for desired number of loops.

As you progress, it's a good idea to separate one side of your complete loops from the other. Not being a fan of complicated fixes myself, I opted to tie the strands together loosely to avoid tangles.  This will save time when you get to the wrapping stage.

You'll know you have the loops arranged correctly if you can put the scarf over your head like a necklace.


When you have constructed your desired number of loops, finish off, but DON'T CUT YOUR YARN!!! You'll have a seam that looks something like this.  It's ugly, though yours might not be as bad as mine.  Good news: we'll wrap up this problem in no time!


I left my yarn connected to the skein, but you may want to leave a 2-3 foot tail.  You will use this tail to wrap a small section of the scarf.  These pictures show how to get started.  You'll cinch it tight and continue wrapping until your wrapped section is the desired width.


My wrapped section is about 4 1/2 inches.  I wouldn't make it any bigger than that.

 Once you've wrapped as much of the scarf as you want, you can snip your yarn, leaving a normal tail for weaving in.  The pictures below will show you how I finished mine, though this certainly isn't the only option.


This scarf is very quick and easy, and it can be worn either long or doubled over, as shown below:


21 February 2013

Table Topper in Thread

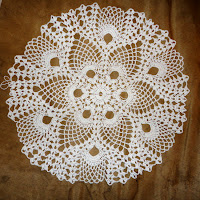
This year's item for a school auction is a round pineapple table topper.  This one is worked in size 10 thread, so it is significantly larger than the one in the pattern.  There's not much to say, except that it's a logical pattern that I enjoyed working, particularly after the center section. (For some reason, I like to work pineapples; I'm not sure why.) It took me about a month to finish it.

Here are some photos of it while it's blocking.


And here is the final product.  I am very pleased with this piece. I think it's elegant, and I hope it fetches a good price at auction.

12 January 2013

Scarves for Grandmothers

These two scarves were made as gifts for the grandmothers this Christmas.  Both were relatively easy to make, and I just used yarn I had on hand, as it wasn't doing anything except waiting for the right project to show up.

 This one came from Mrs. Micawber's Recipe for Happiness.   The pattern has a fantastic tutorial and comes with both charted and written instructions.

It's a narrow scarf that can tie in a variety of ways. It is a fast pattern and isn't picky about yarn size. I would say, though, that you should stay away from highly textured yarns for this pattern because the "lace" part of Queen Anne's Lace would be totally lost.


This scarf pattern can be found only as a ravelry download. It is called the Leafy Lacey Scarf, and it is written by Anette Bak.  It also comes with a really good tutorial.

As with the first scarf, a textured yarn would be a poor choice.  I worked this in a sport weight yarn, and I am really happy with the size.  It is easy to adjust the length on this pattern, though I just stuck with the recommended number of "leaves," and that worked for me.

Largish Doily

I'm working on a thread doily for my cousin to use in her upcoming June wedding. She has opted to use several doilies for her reception tables, and I LOVE the idea.

She selected this pattern. The site is a little obnoxious to me and requires registration, but I haven't received emails from them since I first signed up.

I initially used size 10 thread with a size 5 steel hook, but it was a little too loose, as seen in this photo. I started over with a size 7 hook and got much better results.


I took a pretty good break over the Christmas season, at which point I was gifted a few Jo-Anne gift cards, and I treated myself to a very nice set of steel hooks. The good news is that the hooks are comfy and high-quality; the bad news is that they don't include size 5 or 7. I went with a 6 and had no trouble.

 Here are a few photos of progress. I'll make a few more notes about construction when it's finished.